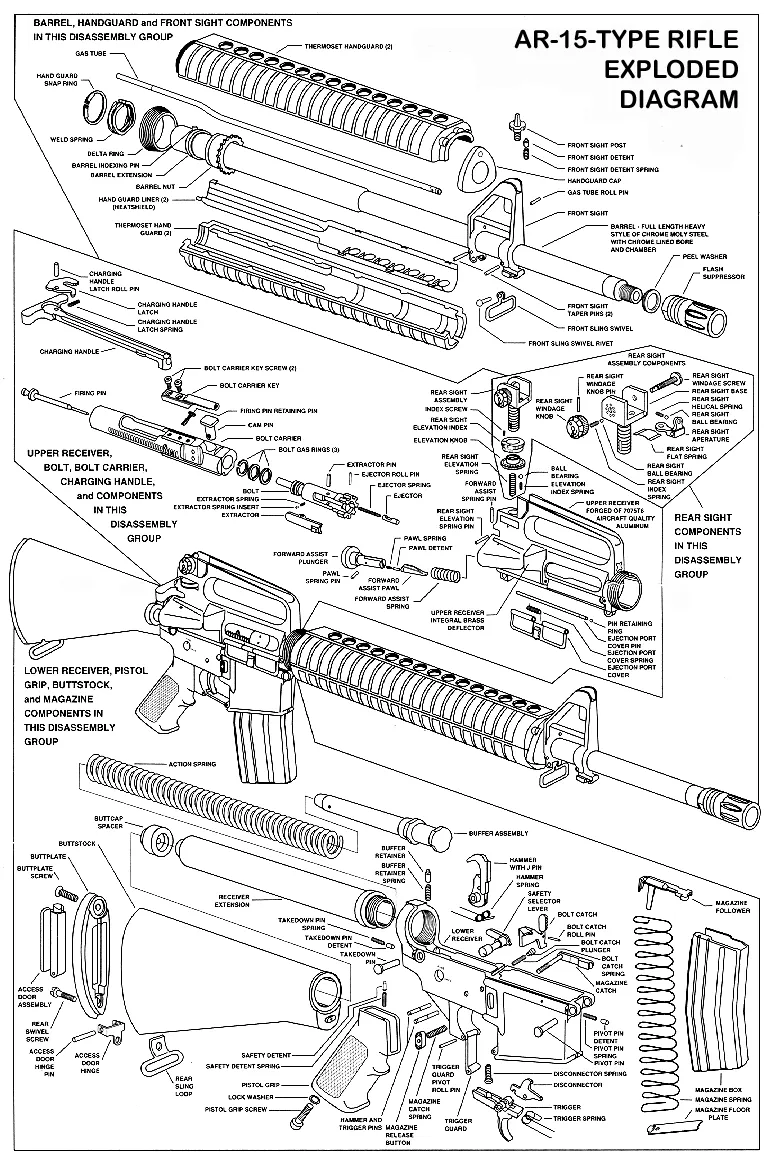
Tune your AR-15 for Suppression
Tuning your rifle for suppressor has several advantages.
· Less gas through the ejection port. Adding a suppressor increased restriction and introduces more gas blowback. Tuning and significantly reduce the amount of gas that migrates out the ejection port and into our eyes and breathing.
· Extra gas pressure is harder on your action and brass. This causes more wear, and requires cleaning and maintenance
· Tuning can reduce the recoil resulting in a softer shooting and often more accurate rifle.
· Les gas can reduce the “Port Pop”, resulting in a quieter suppressed rifle.
Tuning an AR-15 for a suppressor involves several steps to ensure reliable and safe operation. Here's a guide to help you through the process:
Understand the Basics
A suppressor increases back pressure and can affect the gas system and cycling of the AR-15. Tuning involves adjusting the gas system and sometimes the buffer system to accommodate these changes. Most of these parts can be swapped out with basic tools and little know-how.
1. Adjust the Gas System
· Adjustable Gas Block: Install an adjustable gas block. This allows you to fine-tune the amount of gas that runs the action on the firearm.
· Installation: Replace the standard gas block with an adjustable one.
· Adjustment: Start with the gas port nearly closed and gradually open it until the rifle cycles reliably. When there is minimal gas to hold the bolt back on an empty magazine your gas block is properly tuned. Another option is to allow it to be slightly over gassed when suppressed so it will operate reliably when unsuppressed.
· This can have the most effect on tuning your rifle. Once you get rid of the excess gas your will immediately be rewarded with a better shooting rifle. Your rifle will shoot smoother, port noise will be reduced, and you will have much less gas in your face.
2. Consider a Heavier Buffer
· Buffer Weight: A heavier buffer will keep the bolt locked into battery longer. This can help to mitigate the extra gas trapped in barrel due to the backflow of the suppressor. It can also reduce the amount of Port Pop. The additional weight helps to slow down the cycling of the bolt carrier group, resulting in the additional benefits of reduced felt recoil, improved control, and potentially enhanced accuracy.
· Most ARs have a standard carbine buffer mainly because it saves a bit of cost, the standard buffer has three steel weights in the buffer and has an overall weight of 3 oz. Heavy buffers add one or more expensive tungsten weights. An H1 has a weight of 3.8 Oz, H2 4.6 oz. H3 5.4 oz. The original rifle design (rifle length sock) had a buffer weight comparable to the H3 in weight. Pistol ARs work on direct blowback and often have a heavier buffer made from steel with varying weights and can be up to 8 oz. The heavy pistol buffer is required to keep the bolt closed longer for this direct blowback operation.
· Using a buffer system like the JP Enterprise Silent Capture System can help you tune it further than a just replacing the buffer itself.
· Installation: Swap out the existing buffer for a heavier one.
· Testing: Test the rifle to ensure it cycles properly. You may need to re-tune your gas block if you installed a heavier buffer after initially adjusting the gas block without a heavier buffer.
3. Check for Over-Gassing
· Ejection Pattern: Observe the ejection pattern of your spent casings. Ideal ejection is typically around the 3-4 o'clock position. When your brass is ejected more forward 1 or 2 o’clock it may indicate over gassed. Brass ejected behind at the 4 or 5 o’clock position can mean under gassed or short stroked.
· Over-Gassed: If casings are ejecting towards the 1-2 o'clock position, the system is over-gassed. Close the gas block slightly and retest.
· Under-Gassed: If casings are ejecting towards the 5-6 o'clock position, the system is under-gassed. Open the gas block slightly and retest.
· Look for extractor and ejector marks: Marks or cuts on the base of the brass can indicate that the firearm is over gassed or has excessive pressure. Extra pressure would also be shown by flattened (pancaked) primers.
4. Test and Fine-Tune
· Live Fire Testing: After each adjustment, test fire the rifle to ensure reliable cycling and proper ejection patterns.
· Fine-Tuning: Continue to make small adjustments until the rifle operates reliably with the suppressor attached.
5. Regular Maintenance
· Cleaning: Suppressors increase the amount of fouling in the action and gas system. Regular cleaning and maintenance are essential to ensure reliable operation.
· Inspection: Periodically inspect the suppressor, gas system, and other components for signs of wear or damage.
Additional Tips
Suppressor Type: Different suppressors can affect the gas system differently. Ensure your suppressor is compatible with your AR-15. Flow through suppressors are ideal for ARs and other gas operated semi-automatics, they significantly reduce the backpressure and can eliminate the requirement for tuning. A correctly tuned rifle will always reward you, however.
Ammunition: Suppressed shooting often benefits from subsonic ammunition, but this may require additional tuning of the gas system. Different ammunition most likely will have different results from the fine tuning. Most ARs are designed to have enough gas to work with all compatible ammunition for the firearm. This in effect means they are “Over Gassed” for most applications.
By following these steps, you can effectively tune your AR-15 for use with a suppressor and benefiting greatly with better performance. Always consult with a knowledgeable gunsmith if you are unsure about any modifications or adjustments.

Yowie Outdoors
Blaine, MN 55449


Facebook
Instagram
X
Youtube
TikTok